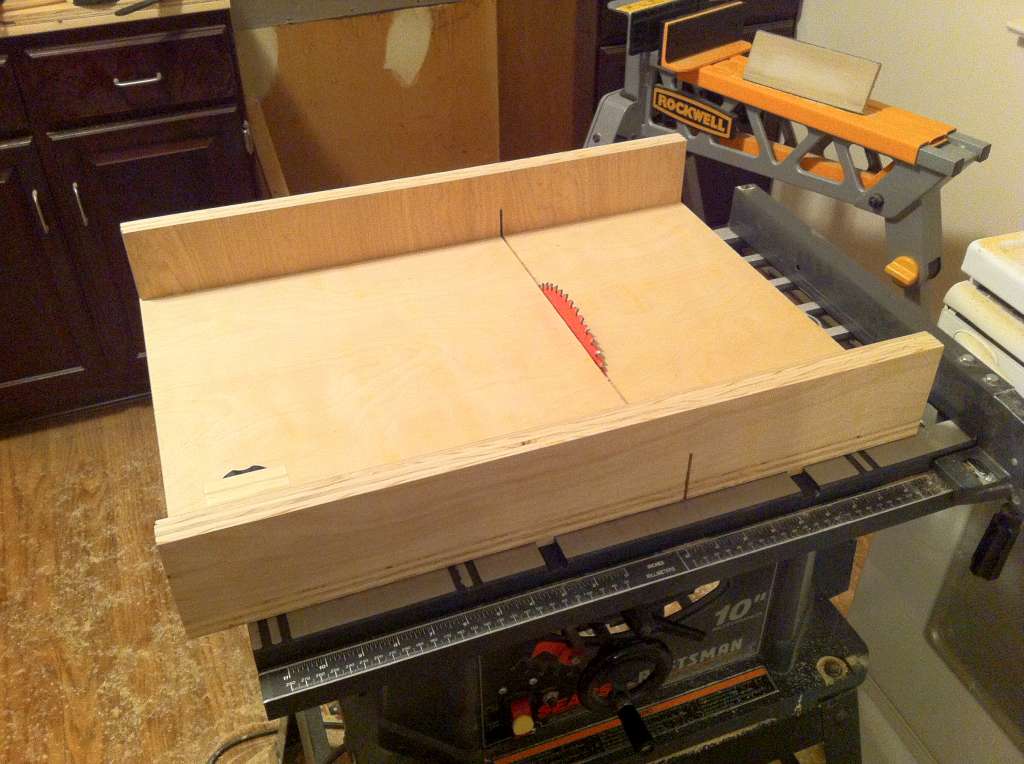
Table Saw Sled
The table saw is one of the most versatile tools for woodworking and it can be made even more functional with a cross cut sled. With this tool, I was able to safely use the table saw to rough out most of my cannon carriage, which started as a small block (roughly 1.5"x2.5"x1.5"). I would never think to do that with a stock table saw. Instead of the workpiece sliding on the table with a potential for getting hung up and rotating, it sits firmly on the sled which does the sliding. The workpiece sits against the fence which is aligned very precisely to 90 degrees from the blade, and the 2 rails ensure the sled runs straight without twisting. I used 3/4" birch plywood for the base and fences with 1/4" birch plywood laminated on the fences. I cut a T slot in the user side fence for a stop block. This is very useful for repeated cuts. The rails are made from maple.
I started with 2 pieces of maple that were thinner than the depth of my table saw's miter slots by about 0.030". You want the sled to ride on the table and don't want the rails hitting the bottom of the slots. I cut the rails to the proper width for a snug, sliding fit in the miter slots. I placed some washers (~0.040" thick) on the bottom of the slots, placed the maple rails on top of the washers, coated them in glue, placed the base of the sled on them as squarely as possible and set some weight on top. The washers raise the rails just above the table so the base can be securely glued to them. When the glue dried, I drilled holes through the rails and base, glued in dowels and trimmed them flush. Most people seem to use screws, but I wanted to try something different. I won't go into more detail about the construction because there are some good videos on YouTube about this. I based this sled on numerous designs I found, but it is most like Steve Ramsey's (YouTube: stevinmarin). He had the great idea for a T track stop block. The most critical aspect of this design is ensuring that the user side fence is perfectly square to the blade. I used the 5 cut method to align the fence to the blade, although I got lucky with my initial placement using a machinist's square. I think I was only off 0.005" over approximately a 24" run. The Wood Whisperer on YouTube has a good video about the table saw sled and the 5 cut method. Click the pictures for larger images.
I started with 2 pieces of maple that were thinner than the depth of my table saw's miter slots by about 0.030". You want the sled to ride on the table and don't want the rails hitting the bottom of the slots. I cut the rails to the proper width for a snug, sliding fit in the miter slots. I placed some washers (~0.040" thick) on the bottom of the slots, placed the maple rails on top of the washers, coated them in glue, placed the base of the sled on them as squarely as possible and set some weight on top. The washers raise the rails just above the table so the base can be securely glued to them. When the glue dried, I drilled holes through the rails and base, glued in dowels and trimmed them flush. Most people seem to use screws, but I wanted to try something different. I won't go into more detail about the construction because there are some good videos on YouTube about this. I based this sled on numerous designs I found, but it is most like Steve Ramsey's (YouTube: stevinmarin). He had the great idea for a T track stop block. The most critical aspect of this design is ensuring that the user side fence is perfectly square to the blade. I used the 5 cut method to align the fence to the blade, although I got lucky with my initial placement using a machinist's square. I think I was only off 0.005" over approximately a 24" run. The Wood Whisperer on YouTube has a good video about the table saw sled and the 5 cut method. Click the pictures for larger images.